Texecom Capture Ricochet Sensors

I’ve previously talked briefly about the new Texecom Capture sensors. This is a new range from Texecom and they are clearly trying to simply the product line and harmonise it as much as possible.

They have also very kindly sent me some to have a look at:

These are the Ricochet (wireless) types, although they have also brought out wired equivalents. They have clearly tried hard to rethink the design and make it as simple and consistent as possible. There are quite a few nice touches – the electronics are all in the front part, so when fitting to the wall you’ve only got the actual plate to deal with. Also they are all switchable between ‘pet tolerant’ and normal which is very handy. I’ve had to replace quite a few sensors since recently getting a cat, and in fact this was the main reason for my wanting to replace the sensors.

The design of things like this is really a matter of taste although personally I like this and it’s nice to see someone trying to do something a little bit different. There is an LED but it is inside the circular section and they aren’t used in the Ricochet devices except for when you first set them up.

The dip switch in the middle is used to select ‘pet mode’, in conjunction with a plastic shutter at the bottom which also needs adjusting (indicated by the arrow).

Then it’s simply a matter of learning it to the Ricochet system. There are a couple of ways of doing this and I’ve covered this before. This time, I used the ‘Learn Ricochet’ menu on the panel with the battery out, and then connecting the battery when prompted by the panel. It automatically sets up a zone with the appropriate profile (‘Guard’).

Overall I think these sensors are really nice. They are very simple to install, it’s great to have the optional pet mode and they look a bit different from the norm.

New Texecom ‘Capture’ Sensors

It’s been a long time since I’ve written about my adventures with alarm systems. I still have a box of Texecom goodies to go through, although other life’s priorities have got in the way unfortunately… but I will return to it.

However I noticed something interesting today in that Texecom have launched a new range of sensors called ‘Capture’:

https://www.capture.texe.com/

This is a great bit of marketing, but also looking at the website there seems to be some really interesting tech going on here. For example pet detection comes as standard and there is a choice of ‘pet detection’ algorithms. There is also a range of form factors including ceiling mounts. Now whilst I am far from being a veteran of the security industry I’ve never seen anything quite like this before, so full marks to Texecom for this.

I’m going to try and get on in somehow and have a proper look at it. I’ve been doing some work on my system too, including installing a flush mounted keypad so will post on that soon.

LCDLP-W Ricochet Keypad review

This is the first of a series of short reviews of the various bits of Texecom kit which I have now have, as listed in a previous video. These are my entirely non-expert opinion but hopefully will be of interest if anyone is thinking of getting any of these in.

This is a Ricochet (ie wireless and battery powered) version of the LCDLP keypad. Texecom do a range of keypads, of which this is the highest spec (being the ‘Premier Elite’ range). The cheaper ones have a smaller display (‘Premier’) or no display at all (‘Veritas) and do look rather old fashioned now. I’m not sure whether all keypads are compatible with all panels either.

There are also two types of Premier Elite keypad, one a surface mount (the LCDLP-W is also one of these) and the other a flush mounted one (without the keypad cover for some reason) which needs a back box sinking into the plaster. These come in various different finishes – brass, brushed metal etc. I think these look very nice, and when we get our hall redone I’m going to have one of these installed instead.

The other thing to note is the ‘P’ in the model number means that it also accepts proximity tags. You can get some of the models with and without tag reading capability. I’ve got some tags to look at and I’ll cover them in another post.

So as above, what I’m looking at now is a Ricochet version of the surface mount keypad. To look at it is exactly the same from the front, although a bit thicker and heavier because it has batteries in it. Here is a short video showing you round:

Learning the keypad to the panel is really very straightforward. The main thing to watch out for is to set the keypad address using DIP switches on the rear. If you are only using one (or if this is the primary keypad) you can leave it set as it is (which is address 1). However as I already have a main keypad I set the switches to address 2.

Once is done, you put the panel into engineering mode and press the ‘Omit’ key, then when prompted to ‘Learn Ricochet’ press ‘Yes’ (or the tick). There are then a few prompts to work through but following that the keypad syncs up and then behaves exactly like a wired one.

So the positives are that it is dead easy to set up, no wires are required and it can be mounted pretty much anywhere. There are a few negatives though – the display is off most of the time, and comes to life when you press a key. This is undoubtedly for power saving, and I think you can disable this but if you do it will compromise the battery life significantly. The other thing is that the LCD display is just not as good as the one in the normal keypad, at least to my eyes. It works fine, but the viewing angles and brightness are simply not as good. I wouldn’t really have noticed this without putting the two side by side, when you do it is quite noticeable.

So overall, if you want an easy way to put an extra keypad in, this is it. I would still I think prefer a wired one for the main keypad but for a back door or garage it would be ideal, or even if you just didn’t want to run any wires at all. It’s entirely possible to build a whole system out of Ricochet which is quite a tempting idea if you don’t already have wires in place.

I’ve now installed this by my outer front door, which previously wasn’t connected to the alarm and there are no wires in place. I combined this with one of the contact sensors (see previous post) to effectively add an extra zone which now makes much more sense from a security point of view.

Here is a quick video with a summary of my thoughts and a demo:

Interfacing and configuration

Having installed the interface board there are two stages to configuration. The first is to get the panel itself to trigger the outputs and the second is to interpret them in FHEM and trigger some actions.

The outputs in Wintex are located in a section labelled (helpfully) ‘Outputs’ in the programming menu:

There are a lot of different ways of configuring outputs as you can see. I was previously using the ‘Panel Outputs’ at the top, with ‘System Fully Armed’ being the trigger to throttle down the heating. However, I’m now interested in the eight ‘Digi Outputs’ listed underneath.

For each output there is a bewildering array of possible options – there are eight groups (system, area, zone etc) and each group has numerous other options. For example, the ‘user’ group allows triggering of output on a specific code. The level of detail is really impressive and pretty much anything you can think of is catered for.

My needs are quite simple, I want to trigger an output for system armed (for the heating), and for activation of the PIRs and back door contacts. This is done by selecting the ‘Zone’ group and setting the correct zone number.

The other thing to set is the ‘output function’ which dictates the behaviour. I want to read the status regardless of whether the alarm is armed so I have used ‘Mimic’. There are other ‘attributes’ you can set, I could have used ‘inverted’ which would have pulled the output high on trigger, but I can accomplish the same thing in the software at the other end so I left it alone. I need to think about what else I could use these outputs for, but for the moment I have assigned them to various of the zones around the house including the all-important back door to accommodate the cat.

Once the programming was sent to the panel, I was pleased to see the LEDs displaying what I expected – those corresponding to the PIRs went out whenever it was triggered.

I’m not going to go into great detail on the FHEM configuration, which is a little fiddly (but if you are interested please contact me and I’ll try to help). The Arduino has the ‘Firmata‘ sketch loaded and this is attached in FHEM as a USB device:

The various pins are made available for use (in my case pins 2 – 9) and you then define the pins you want to use as inputs as a separate device:

You can reference the reading of (in this case) ‘TexecomArm’ in logic which does things based on the condition. In FHEM-speak this is done using ‘notify’ events. I have used ‘notify’ events to switch on the main lights in some of the rooms when the PIR is triggered:

It looks a bit complex, but the relevant line is the ‘DEF’ at the top. The command is triggered when TexecomDigi2 (ie the 2nd Digicom output) reads as ‘on’. The event is to ‘set Hue_HUEGroup2 on’ which turns on a series of Hue lights in the room.

The only problem was that we watch films in the front room sometimes, and we turn the lights off. In that situation, you don’t want them suddenly coming back on again. Luckily, FHEM can also talk to various other devices I have including the home cinema amp (a Denon AVR-X2000). Therefore, triggering the output evaluates an ‘if’ expression, and it only triggers the lights on if the amp is off (or rather, if it is not on – ‘ne’ meaning ‘not equal to’). So if the amp is on and we turn the lights off, they stay off. If the amp is off (and therefore no-one is watching anything) the lights come on.

Although these are only small things, they really show the value of having as many data sources as possible and making things work together to really anticipate what you want. I’m really excited to see what else I can think of for this, and further expand how the panel and the rest of my devices at home work together.

Oh and concerning the cat… I now need to get a wifi thermostat for the underfloor heating that FHEM can address. I have a Heatmiser Neo at the moment but this isn’t supported, so I need either a Floureon or Beoks device instead. I’ll post further when I’ve got this working.

Texecom and FHEM interfacing

I have written a few times about my interest in home automation and in particular my use of the German ‘FHEM’ system to link it all together. One thing I have wanted to do for a long time is get the sensor data from the alarm system readable in FHEM to do useful things with, such as turning on lights when PIRs trigger. I would love to be able to do this in software, and whilst I have most of the information I need I’ve not had the time and space to sit down and tackle the job.

We have relatively recently got a cat.

However, we don’t have a cat flap and so we have to open the back door to let her out, and leave it open so she can get back in again. This causing problems with the thermostat for the underfloor heating, and so really I want to switch the UFH off when the door is open and the cat has gone out. This got me thinking about the problem again, as I have a sensor on the back door for the alarm (see earlier posts).

I have come to the conclusion that I’m not going to be able to do this in software, so I started thinking about hardware again. In a previous post I wrote about using one of the panel outputs to trigger an Arduino to throttle down the heating when the alarm was armed, and so I wondered if I could do something similar for zones or other things.

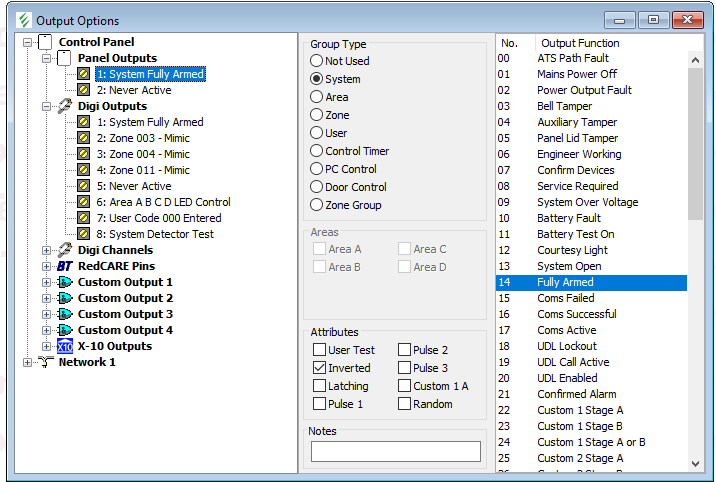
However, the Premier Elite 48 panel I have only has two ‘panel outputs’, one of which I was using. The 88 and 168 panels have more but even then only a total of 5. I thought I could just use the other one, but looking again at the manual I saw the ‘Digicom outputs’ header on the left hand side of the panel:

So here are a total of 8 outputs, and from looking at the manual and in Wintex it seemed that almost anything can be assigned to them. In the earlier post I wrote about the convenience of the ‘open collector’ nature of the panel outputs which means that the various different voltages that things run at (12V for the panel, 5V or less for the Arduino) don’t matter. The Digicom outputs on the other hand are ‘switched 0V’ which means that they are at supply voltage (ie 12V) and pulled low when activated. So these can’t be used for direct connection and some form of hardware interface is needed.

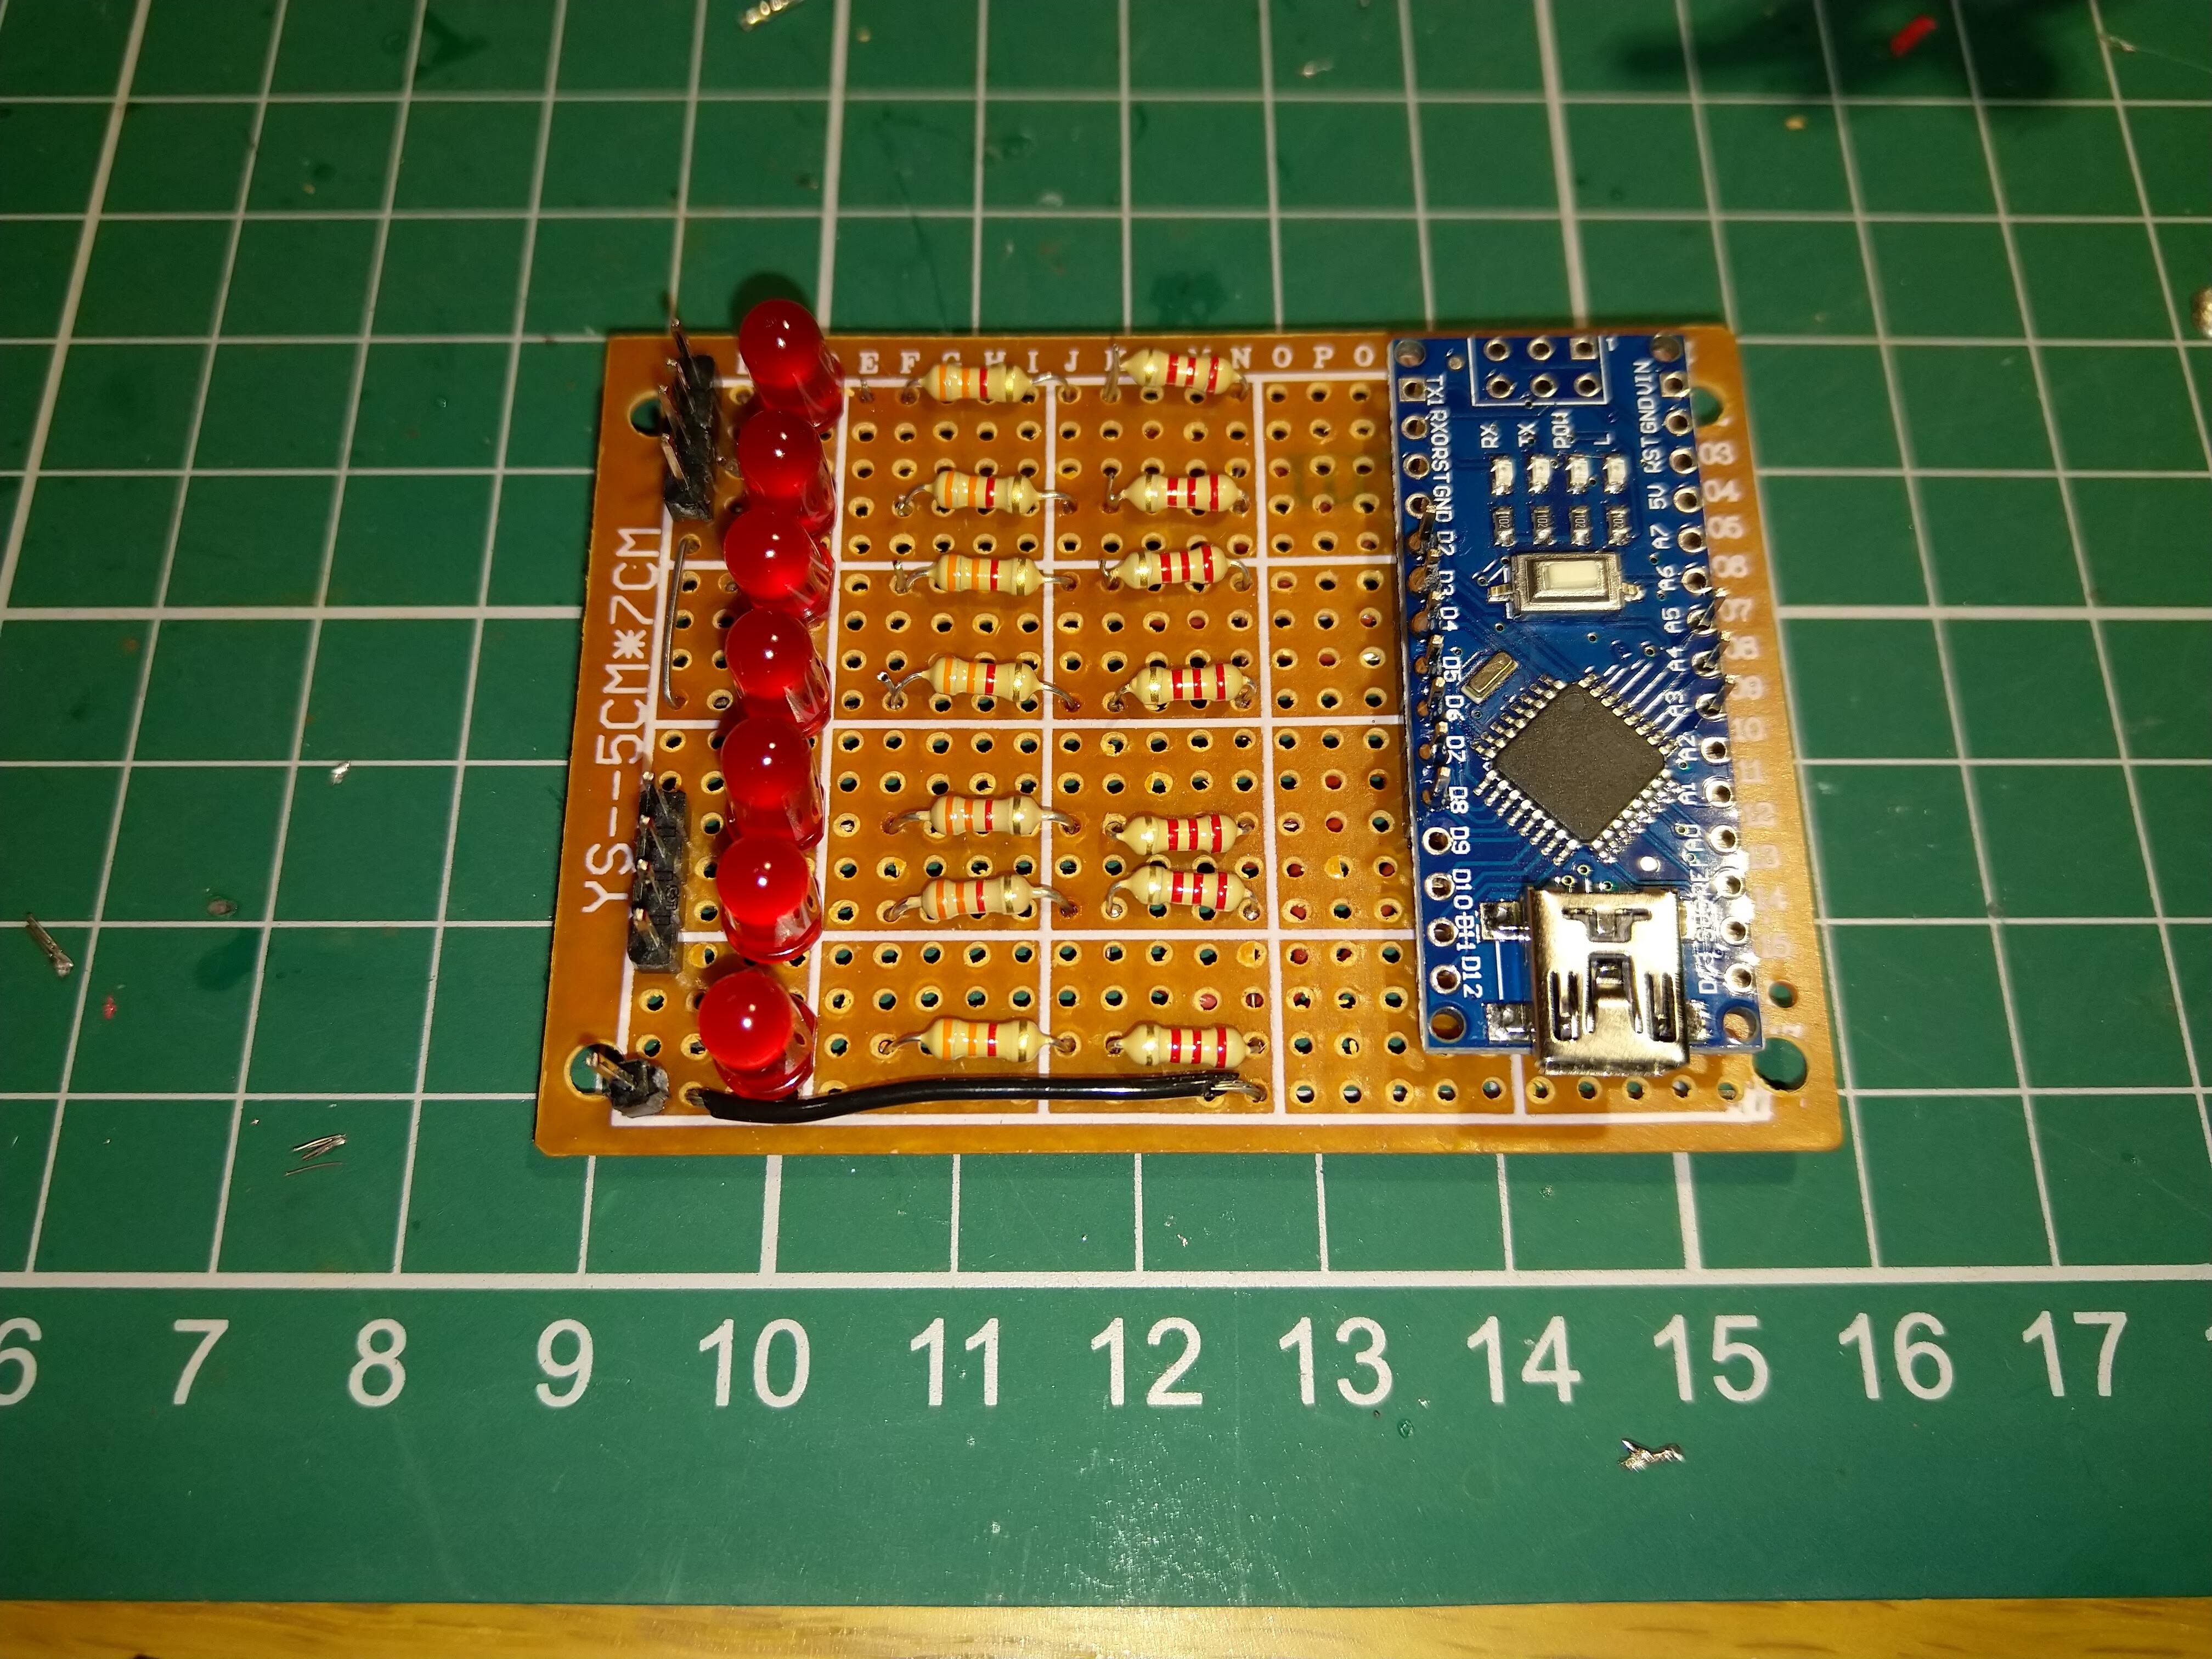
This is of course a very common issue and there is a lot that has been written about approaches to this situation. I read about various options but the simplest seems to be to use a potential divider in which two resistors are used to split the voltage and a tap is taken from the junction between them. In this case, the idea is to reduce the 12V to somewhere between 3V and 5V to feed to the Arduino. I’ll need one for each of the outputs, and it struck me it might be a good idea to have an LED as well to absorb some of the voltage and also allow for some hardware troubleshooting. To make the whole thing as neat as possible I decided to build the interface on some prototyping board and mount the Arduino in the same place.

There is loads of stuff written about how to calculate the values needed, but often it comes down to what you have to hand. I have a junk box with various components but after a bit of digging around I found some 3k3 and 2k2 resistors, and after putting an LED in series first and applying 12V I was getting about 4.2V at the junction, which seemed fine. I added a few other refinements including pin headers for connecting the Digicom and 0V lines, and I mounted the Arduino on the same board with connections in to each of the digital pins.

The result looked like this:

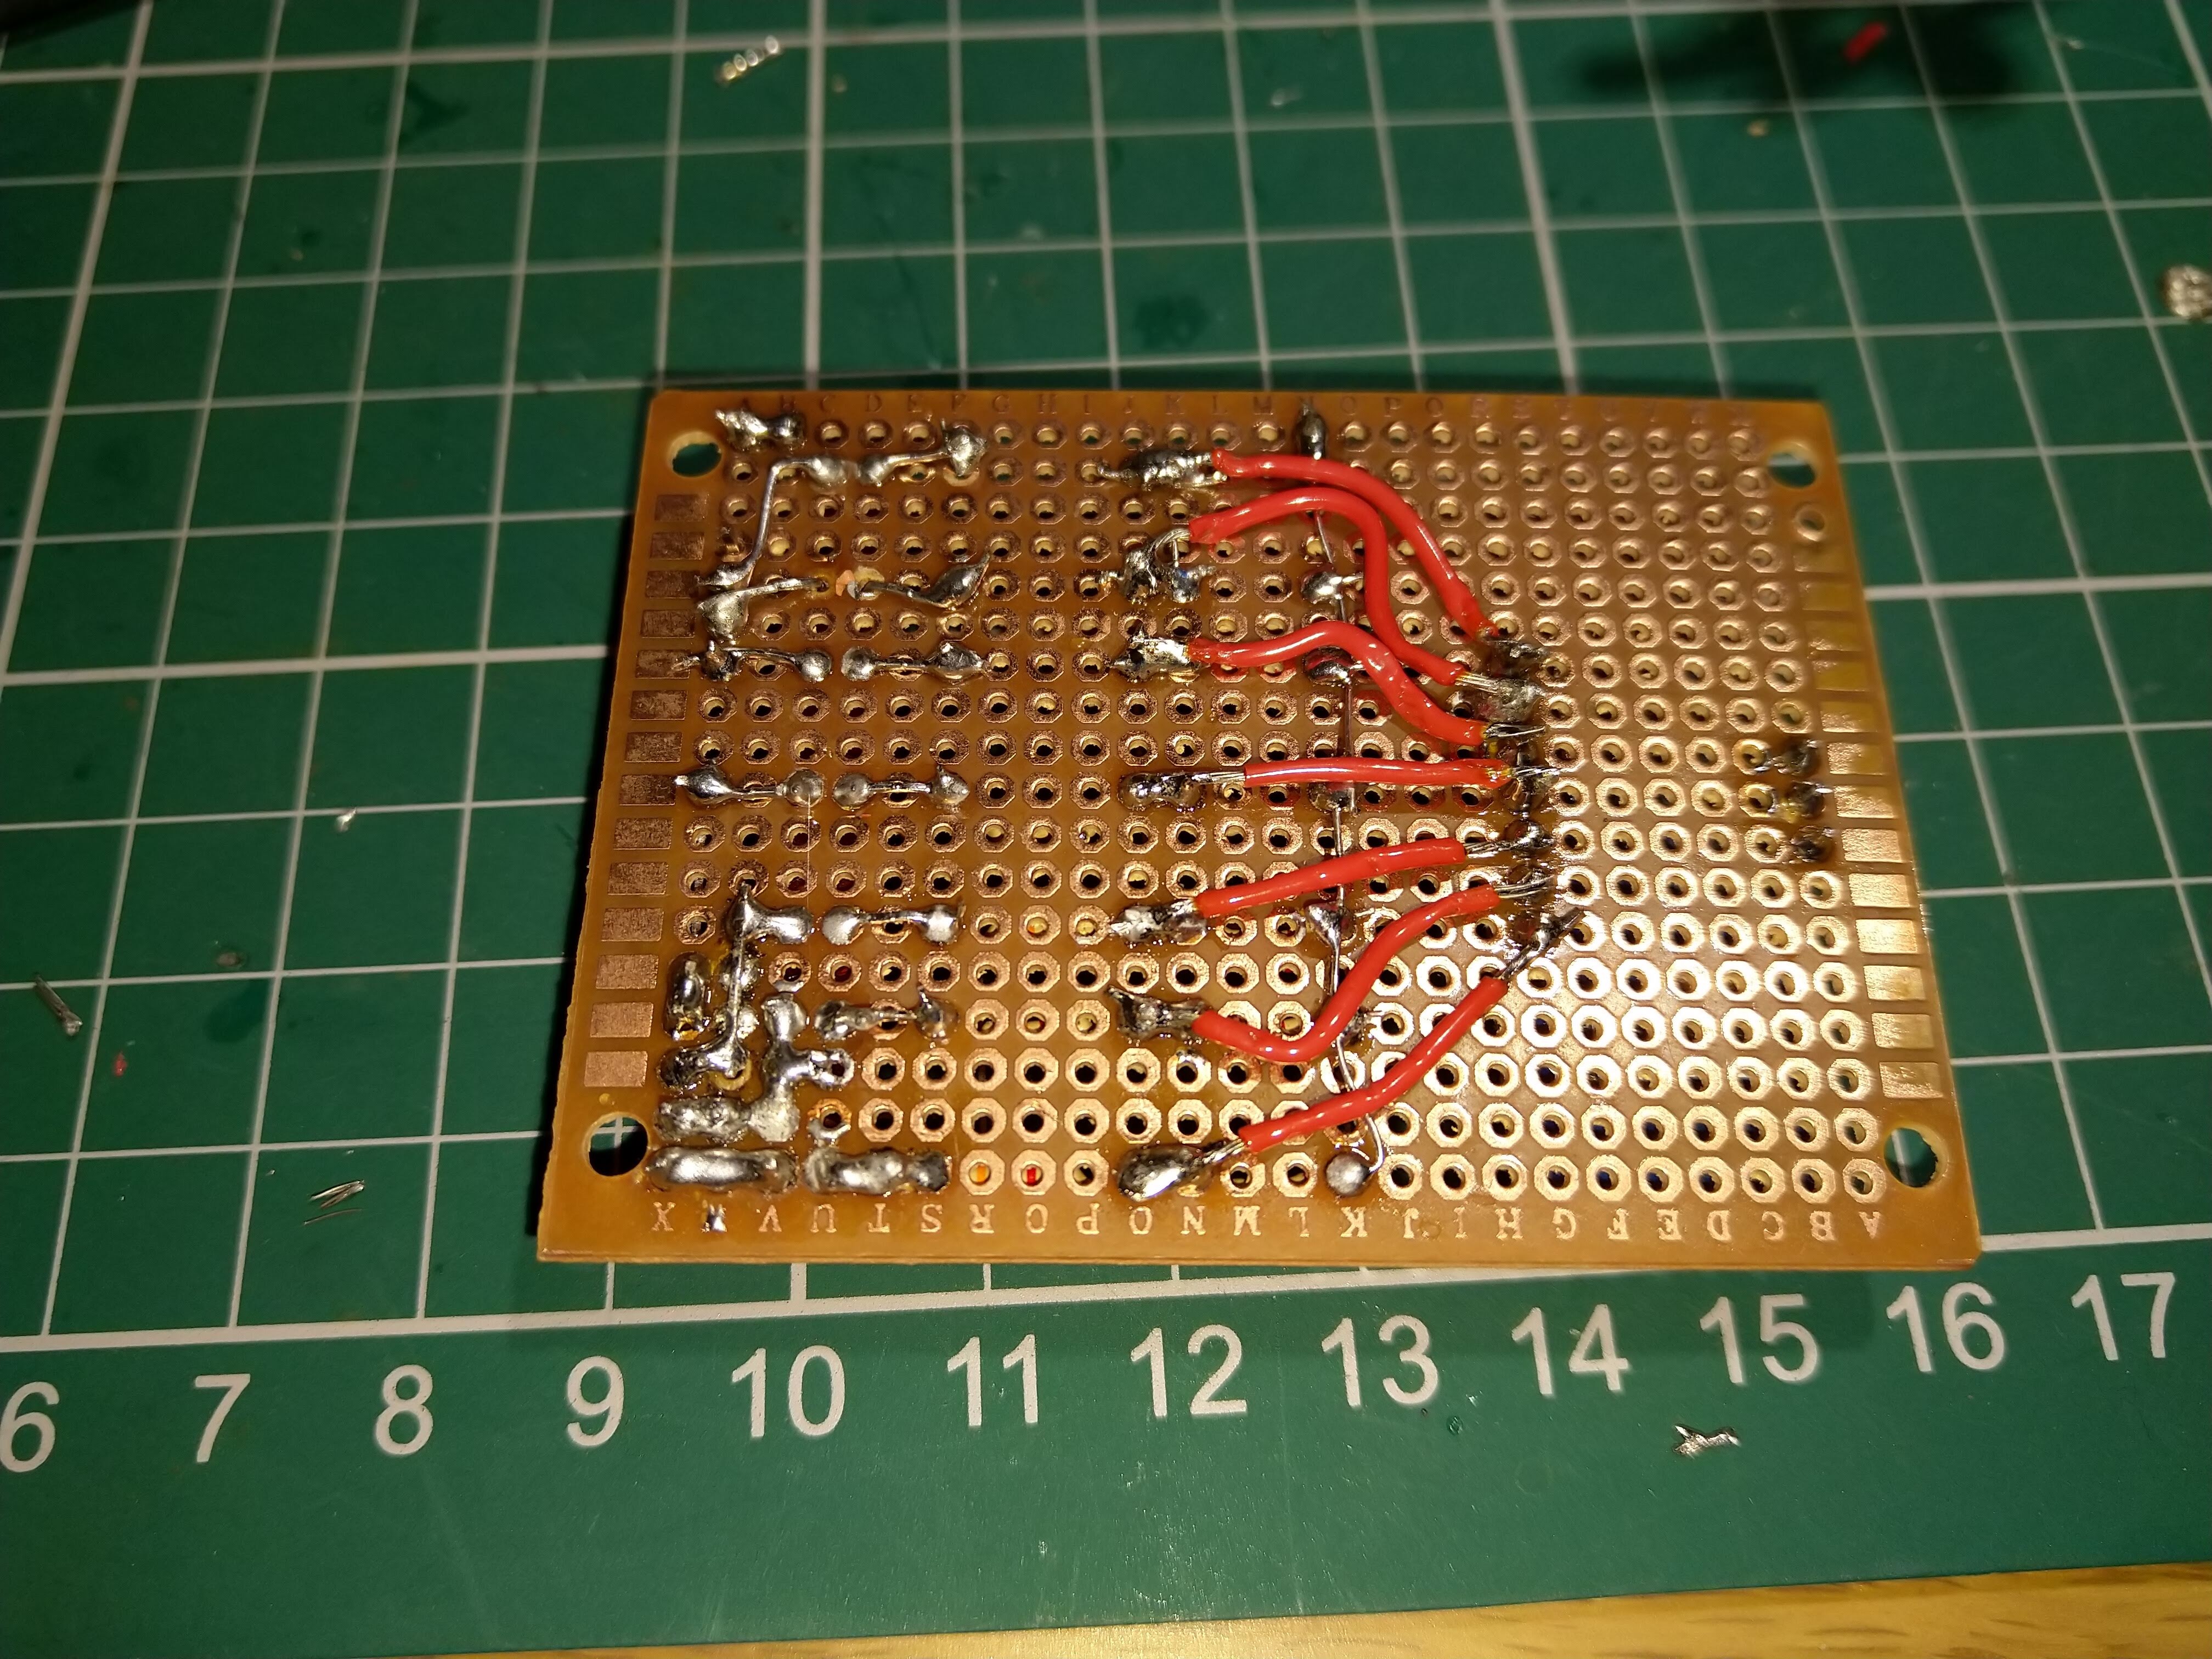
Not perhaps the neatest bit of soldering ever… and I have definitely learned a few things about using this type of circuit board. I used short pieces of wire to connect from the divider to the Arduino, and some wire links here made from component leads here and there. The pin headers on the left are in two sections. The LEDS are significantly underrun but they are quite visible when lit up.

The other thing to note (not easily visible above) is that the 0V line from the Arduino was connected to the 0V line coming from the panel to minimise the risk of spurious readings or other odd behaviours (otherwise the Arduino ground is via the USB to the computer, ie not common).

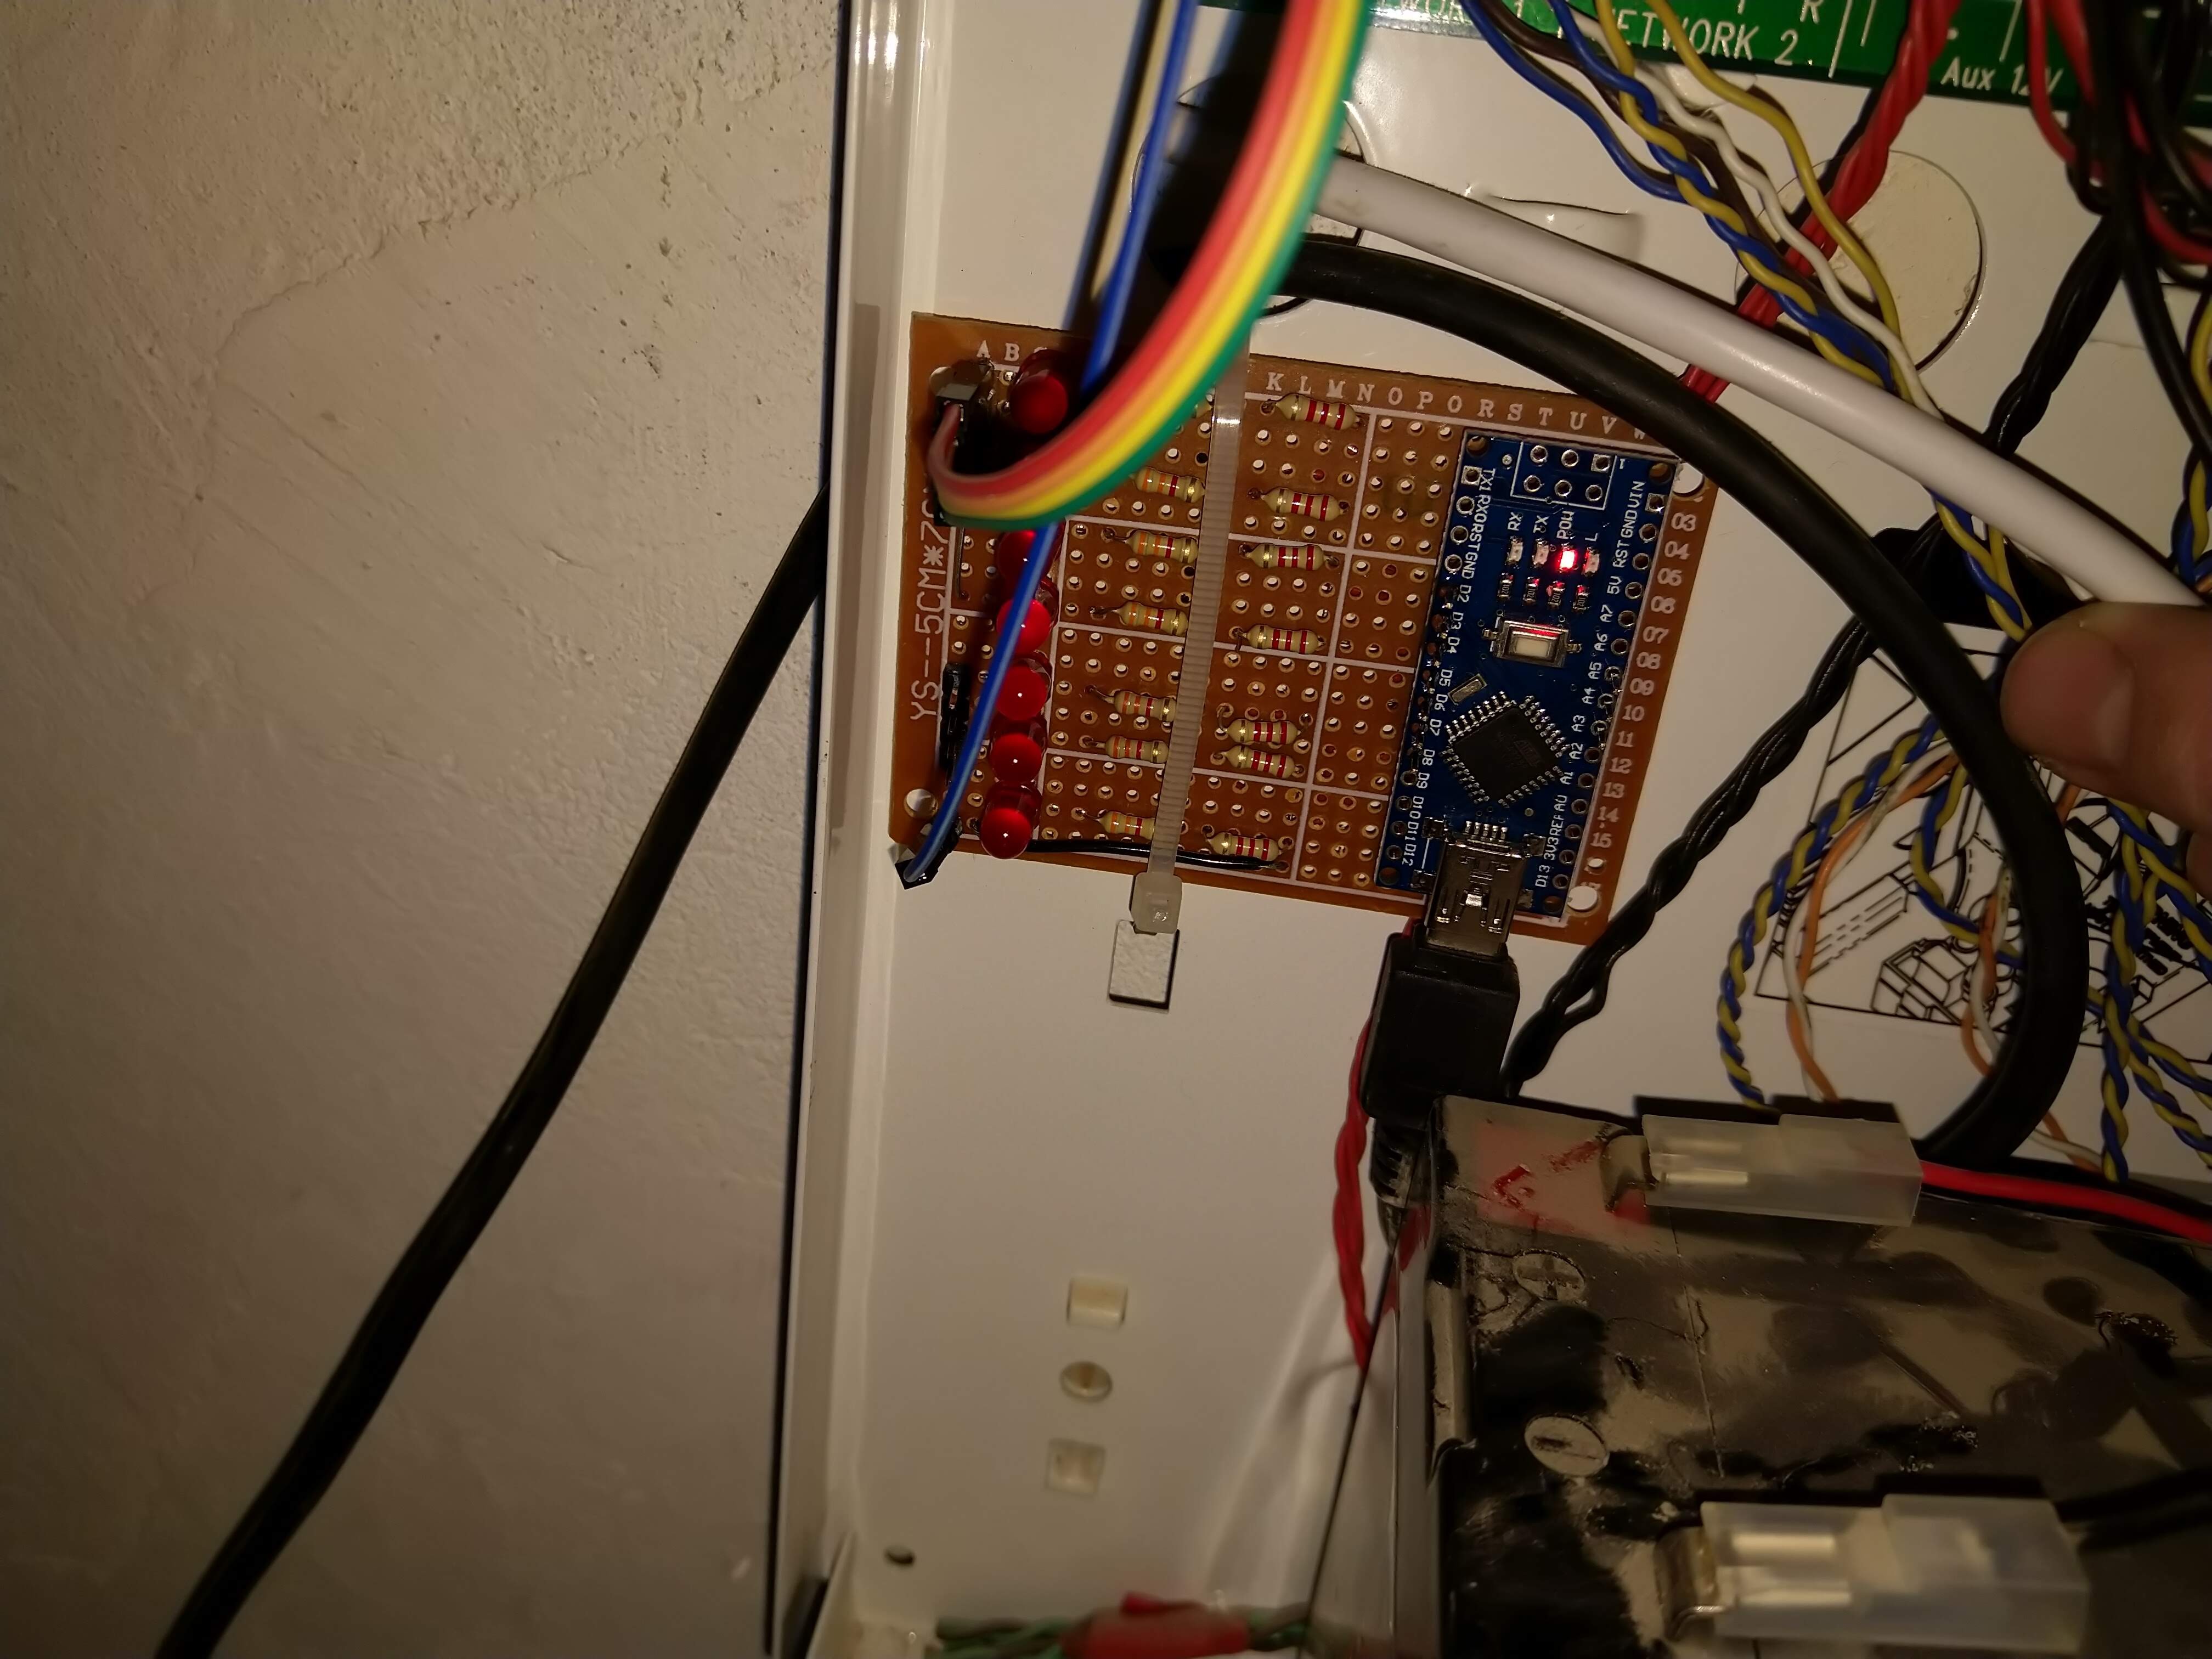
Final job was to install in the Premier Elite casing:

I used some short ‘Dupont’ cables to connect to the Digicom terminals, in truth these were too thin to work well so I tinned the ends with solder before connecting them to the terminals which helped make a sturdier connection.

I was very pleased to see some of the LEDs light up when connected, although it will need some configuration in Wintex to get them working as I want them to.

So the hardware is done… now on to the software!

Unboxing Texecom goodies

At long last I am able to return to an interesting box of Texecom sensors and other equipment which I first wrote about some considerable time ago.

I thought I’d start with another video, just to show you what I have got and to set the scene, and then I’m going to work through each item and write about as well as hopefully accompanying with some short videos. I’m not giving up on the blog though as I still think it’s easier to find this sort of thing when it’s written about as well as on a video.

If anyone in particularly interested in hearing about any of these items then please let me know and I’ll start with those, otherwise I’ll work through them one at a time.

I’m still quite new to the videoing business, so apologies for the limited production values, I’ll see if I can improve that too as we go along. However I was keen to get something out there as a start.

More soon!

Lots of new hardware!

After what has been quite a long wait since the original announcement, there is now finally a lot of new Texecom hardware and software released to go with the recent v4 firmware release.

The first of these is the ‘Texecom Connect’ app, which promises a significantly improved user experience over the former apps, which from my experience didn’t work well and were quite basic. The main problem with the app from my point of view is that it is for iOS only… and I don’t have any iOS devices at all. So until an Android version comes out I’m not going to be able to get any further with this.

TexecomConnect

There is more info about the app (and the rest of the range) here

The other and more interesting products from my perspective are the Texecom Connect hardware interfaces. The most important is the Texecom Connect SmartCom:

smartcom

I’ve not quite got my head around this yet, but it appears to be provide quite a wide range of capabilities including an ethernet interface (so the same as the COMIP) but also provides an interface with an upcoming range of home automation products. I’m not sure if it interfaces with any other standards (ZWave etc) but it is using Ricochet protocols to communicate with the ‘SmartPlug’ (see below). I’ve been quite impressed with Ricochet for the sensors etc, and this is quite an ambitious move to take hold of the burgeoning home automation market.

smartplug

The ‘SmartPlug’ as seen above is exactly as the name implies. This is a good start although from my own experiences of HA you really want something which can be ‘stealth’ installed and not lose the manual control. So for a table light it’s all very well switching it through the Texecom app but you also want to be able to switch it by hand. However, the idea of integrating HA with alarm sensors hasn’t been done very much and especially not by mainstream security companies.

What is also good news is that the pricing is a lot more sensible than before, with the SmartCom available for about £75 (from Alert Electrical among others):

smartcomsale

Overall I think these are very interesting developments and it’s great to see Texecom developing their products and expanding their functionality. I’m still really interested in being able to use the whole range as part of a bigger HA system and I would love to be able to surface the sensor data into Fhem. I am sure this is possible and I have got some documentation but I will need brush up my programming skills quite significantly first!

I’m looking forward to seeing what else comes out, and maybe at some point I will get some of it in to play with.

Finally… v4.00 is here!

After over a year of waiting the day has finally come, and Texecom have released v4.00 of their firmware for all Premier Elite panels.

The highlights listed on the main website include a number of interesting items, being a new API for integration with other systems, support for the home automation products which Texecom themselves are going to produce and some more technical changes including improved network speed. There is also support for the ‘SmartCOM’ combination device which is not out yet but will apparently combine an expander with wifi and ethernet interface.

One specific item which is interesting is that all new panels will have a unique ID generated in the factory, and anyone with an older panel who upgrades will have an ID generated and written to the panel by Wintex after upgrading.

There is a detailed guide to the changes available here.

I now need to dust off the firmware upgrade board and get cracking! I will post my experiences. I’m looking forward to seeing the new hardware range which will go with this and also to see what can be done with the new API and integration capabilities.

Texecom Connect – still waiting…

It’s been a little whilst since the last post, but I have been waiting for there to be some devleopments with Texecom to write about. My system is working pretty well now and so I’m looking forward to more developments.

However looking back I’ve realised that it’s nearly a year since Texecom made their big announcement of ‘Texecom Connect’ with promise of integration with home automation and various other goodies. However since then things have largely gone quiet and there hasn’t been a firmware update for almost a year as well.

There is some evidence of stuff going on behind the scenes including the wireless firmware upgrade, and I’ve just heard of another one which is intended to support a wireless keypad. This sounds like an interesting development as there hasn’t been a new keypad for quite some time.

So I’m keeping fingers crossed that we will hear something soon. In the meantime I am working on my home automation gear with quite a few interesting things to talk about so will post about these soon.

Integrating Home Automation & Alarm

I have been thinking lately about improving my approach to home automation, and particularly in making better use of the various technologies I’ve got. I think one of the mistakes made in home automation generally is neglecting the ‘automation’ part. I’ve seen plenty of approaches which really just substitute one set of switches for another (albeit electronic). I can’t see much point in in switching lights on and off using a phone or remote when it’s much easier to do so using the light switch! So really what you want is a largely automatic system which anticipates your needs and does what you want without user intervention.

So far as I have written about before I already have a mixture of systems with MAX for heating (currently controlled using FHEM) and Z-Wave for which I have been using a Vera Lite. I have been using a 3rd party plugin which provided an interface between the Texecom panel and the Vera, but in spite of this I’ve never been that happy with it as a controller. The interface is rather old fashioned, the newer updates (so called UI7) have had a decidedly mixed reception and I’ve never really felt I understood how to program it properly. Whilst the UI looks pretty it was also rather clunky when you tried to use it.

I’ve written before about FHEM and whilst I know it’s not everyone’s cup of tea I have really got to like it because although it looks unappealing it gives you a huge amount of information and lets you do pretty much anything you want with a few command lines. I also think that it helps you understand a lot more about the devices you are using. So the obvious thing to do was to bring all my Z-Wave devices into FHEM and try to integrate heating and lighting and also build integration with the Texecom panel.

The key to all this is a USB Z-Wave adapter for my main server. These don’t come cheap and there is some choice. I eventually bought an Aeotec Z-Stick Gen5, which came recommended but pretty expensive at about £40.

aeotec-z-wave-usb-z-stick-526


There are others available, including the Z-Wave.Me UZB which seems rather cheaper. This should also work with FHEM and other software although the Aeotec seems slightly better established. The other and much cheaper option is to use an experimental method whereby CULFW devices can be set up as Z-Wave controllers. However this lacks some of the benefits of the proper controllers (including battery back up etc) and probably is not for ‘production’ systems just yet.

So far all has gone well. FHEM recognised the controller and configured it correctly. I had to ‘exclude’ all the devices from the Vera to reset them and then ‘include’ to the Z-Stick. You can do this either by physically taking the stick to the device and pressing the button on the stick, or else simply setting the Z-Stick into ‘inclusion mode’ from FHEM and then doing whatever is needed on the device.

I would recommend doing the latter, as then FHEM will automatically pick up and configure the devices for you. I now have a variety of Fibaro devices and a Minimote which are all available as devices in FHEM with a lot of detail about them. I have recreated a few scenes which I was using before (such as one which turns on a few table lamps in the front room).

Now I need to find a better way of integrating with the alarm. I am using an Arduino with one of the outputs from the panel to report whether the alarm is set or unset and therefore whether the house is occupied or not. I’m using this at the moment to trigger a ‘notify’ event in FHEM which sets the heating into low power mode and now sends Z-Wave events which turns off all the lights. What I would really like is to get FHEM to interface directly with the panel to read out the status of the sensors etc directly. I have been able to get some information about this so I am going to see if I can learn how to do this.

As always I’d be very interested to hear from anyone else who is exploring this kind of thing.